iPhone stuck in headphone mode after water damage? Learn why this happens and 11 proven fixes to restore normal speaker sound today.
Quick Answer
Water damage triggers your iPhone’s moisture sensor, tricking it into thinking headphones are plugged in even when the port is empty. Dry the port fully with the Water Eject Shortcut, silica gel, or 24–48 hours of air drying before attempting other fixes. Avoid rice, heat, and compressed air, since these can worsen internal damage.
Table of Contents
- Introduction
- Why iPhones Get Stuck in Headphone Mode
- Immediate First Aid: What to Do in the First 30 Minutes
- Fix 1: Use the Water Eject Shortcut
- Fix 2: Check for the Moisture Warning Alert
- Fix 3: Air-Dry the Port Properly
- Fix 4: Try Gentle Physical Drying Techniques
- Fix 5: Clean the Lightning or USB-C Port
- Fix 6: Restart Your iPhone
- Fix 7: Toggle Bluetooth and Reconnect Audio Devices
- Fix 8: Reset All Settings
- Fix 9: Update iOS
- Fix 10: Use a Silica Gel Drying Pouch
- Fix 11: Visit Apple Support or a Repair Technician
- Troubleshooting Table
- Pro Tips
- Common Mistakes to Avoid
- Best Practices to Prevent Future Water Damage
- FAQ
- Conclusion
Introduction
Your iPhone fell in the sink, got splashed at the pool, or slipped out of your pocket into a puddle. Now, even though there’s nothing plugged in, it behaves like a pair of headphones is connected. Sound only comes through the earpiece speaker, the volume feels weirdly muted, and Siri keeps announcing “headphones connected.”
This is one of the most common side effects of liquid exposure on modern iPhones. It happens because the Lightning or USB-C port contains microscopic sensors that detect electrical continuity. Water conducts electricity, so any moisture left inside the port confuses the iPhone into thinking an accessory is plugged in.
This guide is for anyone whose iPhone recently got wet and is now stuck in headphone mode with no headphones actually connected. Whether you have an iPhone 12, 13, 14, 15, or 16, the underlying issue and fixes are nearly identical.
By the end of this article, you’ll understand exactly why this happens, and you’ll have a complete list of safe, effective methods to dry out your device and restore normal audio output — without causing further damage.
Why iPhones Get Stuck in Headphone Mode After Water Exposure
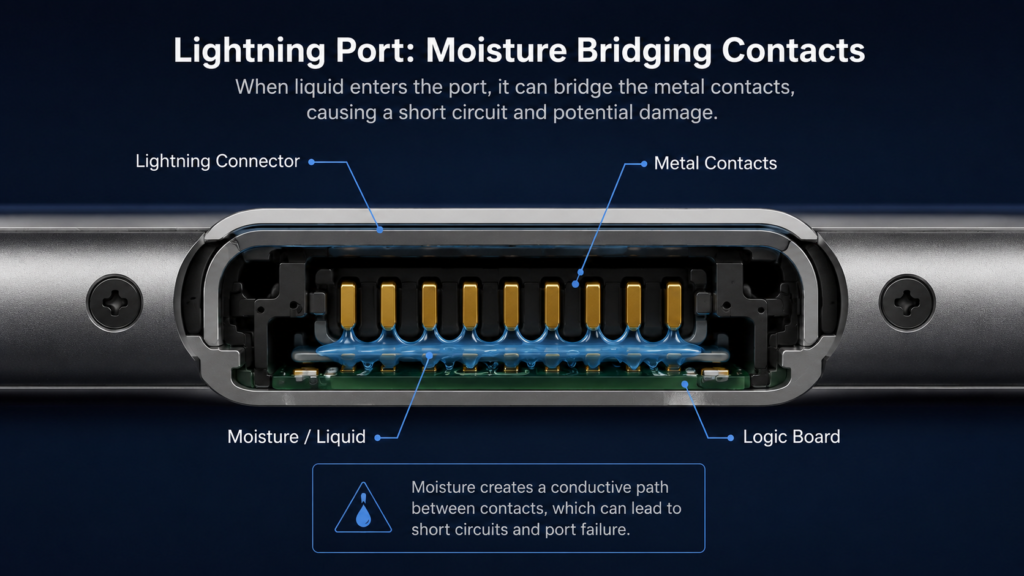
Apple’s Lightning and USB-C ports use tiny contact pins that detect when an accessory is inserted. When water, sweat, or any conductive liquid gets into the port, it can bridge these contacts.
Your iPhone’s software interprets this as an accessory being connected — most commonly headphones, since that’s the most frequent use of the port for audio.
Common triggers include:
- Dropping the phone in water, a toilet, or a pool
- Heavy rain exposure
- Spilling a drink on the phone
- High humidity combined with condensation
- Sweat buildup during workouts (especially with cases that trap moisture)
Once moisture is detected, iOS routes all audio to the earpiece speaker only, disables the loudspeaker, and may show a liquid detection alert. This is a protective mechanism, not a permanent hardware failure in most cases.
Immediate First Aid: What to Do in the First 30 Minutes
Before trying any software fix, follow these steps immediately after water exposure:
- Power off the iPhone if it’s still on and wet. This reduces the risk of short circuits.
- Remove the case so trapped water can escape.
- Gently pat dry the exterior with a soft, absorbent cloth.
- Do not charge the phone until it’s completely dry.
- Do not plug in headphones or accessories to “test” the port.
⚠️ Warning: Charging a wet iPhone can cause corrosion inside the port and permanently damage internal components.
Fix 1: Use the Water Eject Shortcut
Apple doesn’t have an official “water eject” feature, but a popular Shortcuts automation plays a sound at a specific frequency that vibrates water droplets out of the speaker grille.
Steps:
- Open the Shortcuts app.
- Search the Shortcuts Gallery for a “Water Eject” shortcut, or download one from a trusted source.
- Tap Add Shortcut.
- Run it once, then check if sound has improved.
- Run it a second time if needed.
Note: This method targets the speaker grille, not the charging port, but it can help with related moisture issues.
Fix 2: Check for the Moisture Warning Alert
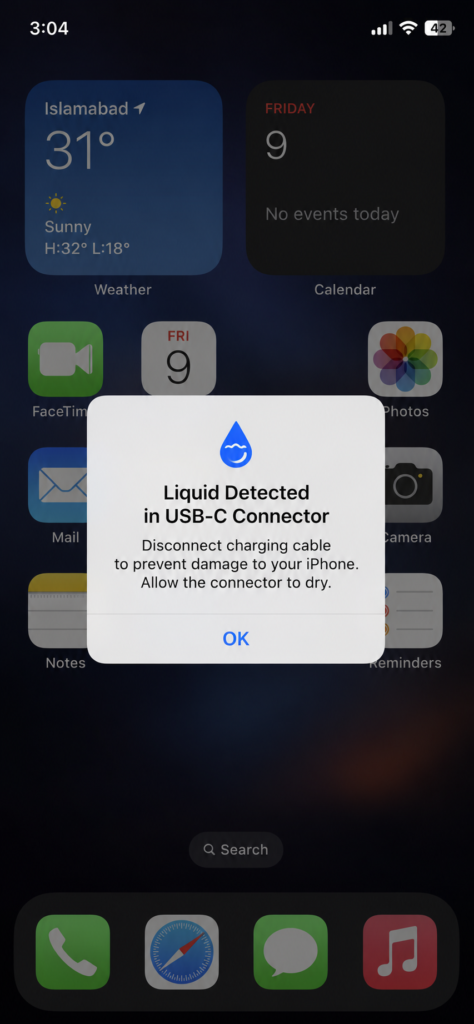
iPhones running iOS 11 and later display a “Liquid Detected” alert when the sensors identify moisture in the Lightning or USB-C port.
Steps:
- Look for a pop-up alert on your screen.
- If you see it, tap Dismiss only after you’re confident the port is fully dry.
- If no alert appears but you still suspect water damage, proceed to the drying steps below anyway.
Real-world example: Many users report the alert reappearing every time they try to charge, even hours after the initial spill. This confirms residual moisture rather than a false alarm.
Fix 3: Air-Dry the Port Properly
Patience is the single most effective and safest fix.
Steps:
- Turn off your iPhone.
- Position it with the port facing downward.
- Place it in a dry, well-ventilated area — not direct sunlight.
- Leave it for at least 24 to 48 hours.
- Avoid touching or testing the port during this window.
Why it works: Evaporation naturally clears moisture without introducing heat or physical stress that could push water deeper into the device.
Fix 4: Try Gentle Physical Drying Techniques
If air drying alone isn’t enough, combine it with these gentle techniques.
Steps:
- Hold the iPhone with the port facing down.
- Gently tap the edge of the phone against your palm a few times.
- Use a soft microfiber cloth to blot (not rub) around the port opening.
- Avoid inserting anything into the port itself.
Tip: Repeat this two or three times over the 24–48 hour drying period rather than doing it once aggressively.
Fix 5: Clean the Lightning or USB-C Port
Debris combined with moisture can trap water longer than an empty port would.
Steps:
- Once the phone feels dry to the touch, inspect the port with a flashlight.
- Use a new, unused, soft-bristled brush (an anti-static brush is ideal) to gently remove lint or debris.
- Avoid metal tools, toothpicks, or pins, which can damage the internal pins.
- Do not use compressed air, as it can push moisture further inside.
Fix 6: Restart Your iPhone
Once you’re confident the port is dry, a restart can clear temporary software glitches related to the audio routing.
Steps:
- Press and hold the side button and either volume button until the slider appears.
- Slide to power off.
- Wait 30 seconds.
- Press and hold the side button again to turn it back on.
Fix 7: Toggle Bluetooth and Reconnect Audio Devices
Sometimes the issue isn’t the port at all — it’s a “ghost” Bluetooth connection.
Steps:
- Go to Settings > Bluetooth.
- Turn Bluetooth off, wait 10 seconds, then turn it back on.
- Forget any previously paired headphones by tapping the (i) icon next to the device, then Forget This Device.
- Restart the iPhone and check the audio output.
Fix 8: Reset All Settings
This clears misconfigured audio routing settings without deleting your personal data.
Steps:
- Go to Settings > General > Transfer or Reset iPhone.
- Tap Reset.
- Select Reset All Settings.
- Enter your passcode to confirm.
Note: This resets Wi-Fi passwords, wallpaper, and privacy permissions, but does not erase photos, apps, or messages.
Fix 9: Update iOS
Outdated software occasionally mishandles moisture-sensor data incorrectly.
Steps:
- Go to Settings > General > Software Update.
- Download and install any available update.
- Restart the iPhone once the update completes.
Fix 10: Use a Silica Gel Drying Pouch
Silica gel absorbs moisture far more effectively than rice, which can leave dust and starch residue inside the port.
Steps:
- Place the iPhone inside a sealed bag or container filled with silica gel packets.
- Position the port facing toward the packets if possible.
- Leave for 24–48 hours.
- Remove and test.
⚠️ Warning: Never use raw, uncooked rice. Rice dust and starch particles can lodge inside the port and cause long-term damage.
Fix 11: Visit Apple Support or a Repair Technician
If the phone still shows headphone mode after 48+ hours of proper drying, internal corrosion or sensor damage may be present.
Steps:
- Back up your iPhone via iCloud or a computer.
- Book an appointment at an Apple Store or Apple Authorized Service Provider.
- Explain the water exposure and headphone-mode symptom clearly.
- Ask for a diagnostic check on the Lightning/USB-C port and logic board.
Note: Apple’s liquid contact indicators (LCIs) inside the device can confirm water exposure, which may affect warranty coverage.
Troubleshooting Table {#troubleshooting-table}
| Problem | Possible Cause | Solution |
|---|---|---|
| Sound only plays through earpiece | Moisture detected in port | Air-dry 24–48 hrs, then restart |
| “Liquid Detected” alert keeps appearing | Residual water in port | Use silica gel, avoid charging |
| No sound at all | Speaker grille blocked or damaged | Try Water Eject shortcut, inspect grille |
| Headphone mode after cleaning | Debris still present | Re-clean with soft anti-static brush |
| Issue persists after drying | Corrosion or sensor damage | Visit Apple Support for diagnostics |
| Bluetooth headphones show as connected | Ghost pairing | Forget device, toggle Bluetooth off/on |
| Audio distorted, not just misrouted | Water damage to speaker driver | Professional repair likely needed |
Pro Tips
- Never use a hairdryer — heat can warp internal components and push moisture deeper.
- Avoid compressed air — it can drive water further into the port rather than out.
- Keep the phone off during the entire drying process to prevent short circuits.
- Elevate the phone port-down on a small stand so gravity assists drainage.
- Check the SIM tray too, since water often seeps in through this opening.
- Test with a wired accessory last, only after you’re sure the port is dry.
- Use a desiccant box if you own one, since it dries faster than open air.
- Document the incident with photos and a timestamp in case you need warranty support later.
Common Mistakes to Avoid
- Charging the phone immediately after it gets wet.
- Using rice instead of silica gel.
- Inserting cotton swabs, toothpicks, or pins into the port.
- Using a hairdryer or heater to speed up drying.
- Ignoring the “Liquid Detected” warning and forcing a connection anyway.
- Shaking the phone vigorously, which can spread water to other components.
- Giving up too early — some cases genuinely need the full 48 hours.
Best Practices
- Use a water-resistant or waterproof case if you’re frequently near water.
- Avoid using your iPhone in the bathroom, near pools, or in the rain without protection.
- Enable the Liquid Detected alert awareness — don’t dismiss it without drying first.
- Keep silica gel packets on hand at home for emergencies.
- Periodically clean your port with a soft brush to prevent debris-trapped moisture.
- Back up your iPhone regularly via iCloud, so a future water incident doesn’t risk your data.
Frequently Asked Questions
Moisture inside the Lightning or USB-C port bridges the internal contacts, which the iPhone interprets as an accessory connection.
Most cases resolve within 24–48 hours of proper air drying, though severe exposure may take longer.
No. Rice can leave starch and dust particles inside the port, which may cause additional problems. Silica gel is a safer alternative.
No. Charging a wet iPhone increases the risk of corrosion and short circuits. Wait until it’s fully dry.
A restart can help clear software glitches, but it won’t resolve the issue if moisture is still physically present in the port.
It means the iPhone’s internal sensors have identified moisture in the charging port, and charging is temporarily disabled for safety.
In most cases, no — it resolves once the port fully dries. However, prolonged exposure can lead to corrosion requiring professional repair.
No. Heat can damage internal components and battery cells. Air drying or silica gel is safer.
Apple technicians can check the Liquid Contact Indicators (LCIs) inside the device during a diagnostic appointment.
Yes, in most cases. Apple’s standard warranty does not cover liquid damage, though AppleCare+ may offer limited coverage with a service fee.
Yes, in some cases a ghost Bluetooth pairing can mimic this issue. Try forgetting the device and toggling Bluetooth off and on.
If your iPhone remains stuck in headphone mode after 48+ hours of proper drying, visit Apple Support or an authorized repair center for a hardware diagnostic.
Conclusion
An iPhone stuck in headphone mode after water damage is unsettling, but it’s usually a temporary, fixable problem rather than permanent hardware failure. The root cause is almost always moisture bridging the sensors inside your Lightning or USB-C port, and the solution is patience: proper drying, gentle cleaning, and avoiding shortcuts like rice or hairdryers.
Start with the safest methods — air drying and silica gel — before moving to software resets. If your iPhone still shows headphone mode after 48 hours of careful drying, it’s time to get a professional diagnostic rather than risk further damage.
Take action today: power off your device, remove the case, and give it the time it needs to dry properly. In most cases, your iPhone’s audio will return to normal without any lasting damage.