Starlink DNS server not responding? Here are 12 proven fixes to restore internet access fast, from quick reboots to advanced router settings.
Quick Answer
Starlink’s “DNS server not responding” error usually means your device can reach the Starlink network but can’t translate website names into IP addresses. Fix it by restarting your router and device, switching to a public DNS like 8.8.8.8 or 1.1.1.1, and confirming your device is set to obtain DNS automatically.
Table of Contents
- Introduction
- What Does “DNS Server Not Responding” Mean on Starlink?
- Why This Happens With Starlink Specifically
- Fix 1: Restart Your Starlink Router and Dish
- Fix 2: Restart the Affected Device
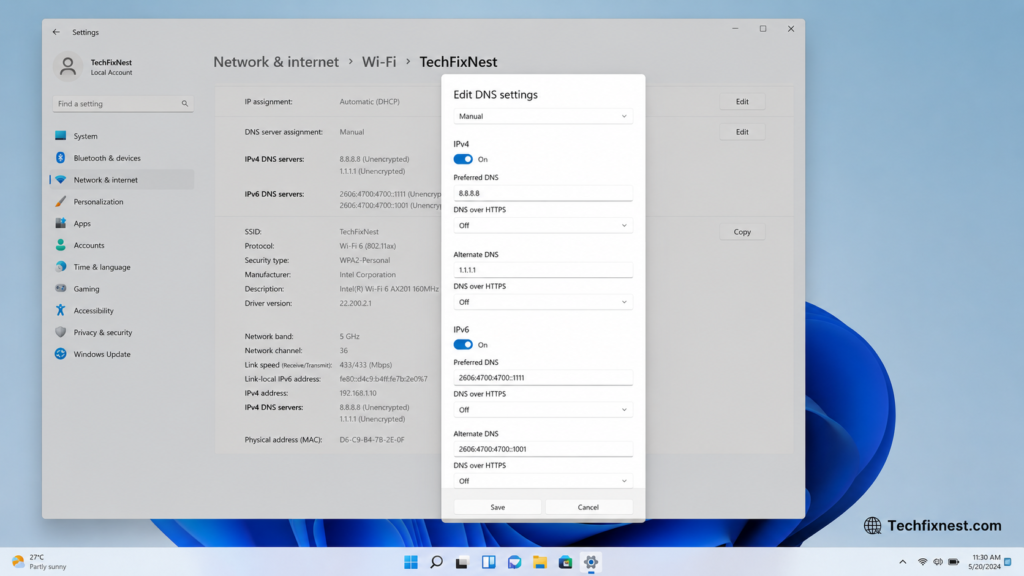
- Fix 3: Switch to a Public DNS Server
- Fix 4: Set DNS to Obtain Automatically
- Fix 5: Forget and Reconnect to the Wi-Fi Network
- Fix 6: Update Network Adapter Drivers
- Fix 7: Disable VPN or Proxy Temporarily
- Fix 8: Flush DNS Cache
- Fix 9: Check for Starlink Outages
- Fix 10: Reset Network Settings
- Fix 11: Check Bypass or Bridge Mode Configuration
- Fix 12: Factory Reset the Starlink Router
- Troubleshooting Table
- Pro Tips
- Common Mistakes to Avoid
- Best Practices
- FAQ
- Conclusion
Introduction
Few things are more frustrating than seeing your Starlink dish pointed at a clear sky, your app showing a solid connection, yet your browser refuses to load a single page. If your device flashes a “DNS server not responding” error, this is exactly what’s happening: your internet connection works, but the system that turns website names like “google.com” into the numeric addresses computers use has broken down somewhere along the way.
This guide is for anyone using Starlink — residential, roam, business, or maritime — who has run into this specific error on a laptop, phone, smart TV, or game console. Whether you’re new to satellite internet or you’ve had Starlink for years, the causes and fixes are largely the same.
By the end of this guide, you’ll understand what causes DNS failures on Starlink, and you’ll have a complete, step-by-step troubleshooting path to get back online — starting with the easiest fixes and working toward more advanced ones if needed.
What Does “DNS Server Not Responding” Mean on Starlink?
DNS (Domain Name System) is often described as the internet’s phone book. Every time you type a web address, your device asks a DNS server to look up the matching IP address so it knows where to send your request.
When you see “DNS server not responding,” your device is saying: I have a network connection, but the DNS lookup request timed out or failed. This is different from having no internet at all — your Starlink dish may be perfectly connected to the satellite network, but the translation step is failing.
You’ll typically notice this error in one of these ways:
- A pop-up from Windows, macOS, or your router app
- Browsers showing “This site can’t be reached” or “DNS_PROBE_FINISHED_NXDOMAIN”
- Apps that load but browsers that don’t (or vice versa)
- Some websites loading while others don’t
Why This Happens With Starlink Specifically
Starlink’s satellite architecture introduces a few quirks that make DNS issues slightly more common than on traditional fixed-line internet:
- Dynamic routing between satellites: Your connection may hop between different satellites and ground stations, occasionally causing brief interruptions to DNS requests.
- CGNAT (Carrier-Grade NAT): Starlink shares public IP addresses across many users, which can occasionally interfere with certain DNS or network configurations.
- Router firmware updates: Starlink pushes automatic updates that can briefly reset network settings.
- Bypass/bridge mode misconfiguration: Advanced users running their own router behind the Starlink dish sometimes create DNS conflicts.
- Weather and obstructions: Signal interruptions can look like DNS failures because requests time out.
Understanding which of these applies to your setup helps you jump to the right fix faster.
Fix 1: Restart Your Starlink Router and Dish
This solves the majority of DNS issues because it clears temporary routing and DNS cache problems on the router itself.
- Unplug the Starlink router (and Power over Ethernet injector, if you have a first-generation dish) from the wall outlet.
- Wait 30 seconds.
- Plug it back in and wait 2–3 minutes for the dish to fully reconnect.
- Try loading a website again.
Tip: You can also do this from the Starlink app under Settings by selecting Restart, which achieves the same result without unplugging anything.
Fix 2: Restart the Affected Device
Sometimes the problem isn’t Starlink at all — it’s a stuck DNS cache or network stack on your phone, laptop, or smart TV.
- Fully power off the device (not just sleep mode).
- Wait 10–15 seconds.
- Power it back on and reconnect to Wi-Fi.
If only one device is affected while others work fine, this is almost always the fix you need.
Fix 3: Switch to a Public DNS Server
Starlink’s default DNS servers can occasionally be slow or unresponsive, especially during peak usage hours. Switching to a reliable public DNS often resolves the issue instantly.
Recommended public DNS servers:
| Provider | Primary DNS | Secondary DNS |
|---|---|---|
| 8.8.8.8 | 8.8.4.4 | |
| Cloudflare | 1.1.1.1 | 1.0.0.1 |
| Quad9 | 9.9.9.9 | 149.112.112.112 |
On Windows:
- Go to Settings > Network & Internet > Wi-Fi (or Ethernet).
- Click your active connection, then Edit next to DNS server assignment.
- Choose Manual, turn on IPv4, and enter the DNS addresses above.
- Save and reconnect.
On macOS:
- Open System Settings > Network.
- Select your active connection and click Details.
- Go to the DNS tab and add the addresses under the plus (+) button.
- Click OK, then Apply.
On iPhone/Android:
- Go to Wi-Fi settings and tap the connected network.
- Switch DNS configuration to Manual.
- Enter the DNS addresses and save.
Note: If you’d rather apply this change once for your whole household, you can configure it on the Starlink router itself via the Starlink app under Settings > Network > DHCP/DNS, depending on your router generation.
Fix 4: Set DNS to Obtain Automatically
If a previous manual DNS entry was mistyped or is now outdated, your device may be stuck trying to reach a dead server.
- Follow the same path as Fix 3 above.
- Instead of entering custom DNS servers, select Automatic (DHCP).
- Save and reconnect to let Starlink’s router assign working DNS settings.
Fix 5: Forget and Reconnect to the Wi-Fi Network
A corrupted network profile on your device can cause persistent DNS errors even after other fixes.
- Go to your device’s Wi-Fi settings.
- Select your Starlink network and choose Forget or Remove Network.
- Reconnect by entering your Wi-Fi password again.
This forces your device to request fresh network and DNS information from the router.
Fix 6: Update Network Adapter Drivers
Outdated Wi-Fi or Ethernet drivers can cause intermittent DNS failures, particularly on Windows PCs.
- Open Device Manager.
- Expand Network Adapters.
- Right-click your Wi-Fi or Ethernet adapter and select Update Driver.
- Choose Search automatically for drivers.
- Restart your PC after the update completes.
Fix 7: Disable VPN or Proxy Temporarily
VPNs and proxy servers reroute your DNS requests through their own servers. If that server is down or misconfigured, you’ll see DNS errors even though Starlink itself is fine.
- Disconnect from any active VPN.
- Check your browser and system settings for proxy configurations and disable them.
- Try loading a website again.
If the connection works with the VPN off, contact your VPN provider or switch to a different VPN server location.
Fix 8: Flush DNS Cache
Your device stores recent DNS lookups locally. If that cache becomes corrupted, it can cause lookups to fail even when the DNS server itself is healthy.
On Windows:
- Open Command Prompt as Administrator.
- Type
ipconfig /flushdnsand press Enter.
On macOS:
- Open Terminal.
- Type
sudo dscacheutil -flushcache; sudo killall -HUP mDNSResponderand press Enter.
On Android/iPhone:
Restarting the device typically clears the DNS cache, since there’s no direct command-line option.
Fix 9: Check for Starlink Outages
Occasionally, the issue isn’t your setup at all — it’s a temporary problem with Starlink’s network in your area.
- Open the Starlink app and check for any service alerts.
- Check independent outage-tracking sites for reports in your region.
- If an outage is confirmed, wait for Starlink to resolve it on their end.
Fix 10: Reset Network Settings
If multiple fixes haven’t worked, a full network reset clears every custom configuration and restores defaults.
On Windows:
- Go to Settings > Network & Internet > Advanced network settings.
- Select Network reset and confirm.
- Restart your PC.
On iPhone:
- Go to Settings > General > Transfer or Reset iPhone > Reset > Reset Network Settings.
On Android:
- Go to Settings > System > Reset options > Reset Wi-Fi, mobile & Bluetooth.
⚠️ Warning: This will remove saved Wi-Fi passwords and Bluetooth pairings, so be ready to reconnect afterward.
Fix 11: Check Bypass or Bridge Mode Configuration
If you’re running your own router behind the Starlink dish using bypass mode, DNS problems are often caused by conflicting DHCP or DNS settings between the two devices.
- Confirm only one device (either the Starlink router or your third-party router) is handing out DHCP and DNS addresses.
- In the Starlink app, verify bypass mode is correctly enabled if you’re using your own router as the primary device.
- On your third-party router, make sure its WAN settings are set to receive an IP automatically from Starlink.
Fix 12: Factory Reset the Starlink Router
As a last resort, a factory reset clears any deep configuration issues that basic restarts don’t fix.
- Open the Starlink app.
- Go to Settings > Advanced > Factory Reset (menu path varies slightly by router generation).
- Confirm the reset and wait for the router to reboot and reconfigure.
- Reconnect your devices and re-enter your Wi-Fi password.
Note: This erases any custom settings, including static DNS entries and Wi-Fi passwords you had set.
Troubleshooting Table
| Problem | Possible Cause | Solution |
|---|---|---|
| DNS fails on one device only | Corrupted local DNS cache or network profile | Flush DNS, forget and rejoin Wi-Fi |
| DNS fails on all devices | Router-level DNS issue or outage | Restart router, check for outages |
| DNS works on Wi-Fi but not Ethernet | Adapter driver or cable issue | Update drivers, check cable/port |
| DNS fails only with VPN active | VPN’s DNS server down or misconfigured | Disable VPN or switch server |
| DNS fails after router firmware update | Settings reset during update | Reconfigure DNS or reset network settings |
| DNS fails in bypass/bridge mode setup | Conflicting DHCP/DNS between routers | Check bypass mode and WAN settings |
| Some sites load, others don’t | ISP-level DNS filtering or partial outage | Switch to public DNS (8.8.8.8 or 1.1.1.1) |
Pro Tips
- Use Cloudflare’s 1.1.1.1 if you want a fast, privacy-focused alternative to Starlink’s default DNS.
- Keep the Starlink app updated — DNS-related bugs are frequently patched in app and firmware updates.
- Avoid stacking multiple routers in bypass mode unless necessary; each additional hop adds a potential point of DNS failure.
- Test with a wired connection to rule out Wi-Fi interference as the root cause.
- Note the exact error message — “DNS_PROBE_FINISHED_NXDOMAIN” versus a generic timeout can point to different causes.
- Check obstruction alerts in the Starlink app, since satellite signal drops can mimic DNS errors.
- Restart your router monthly as preventive maintenance, especially if you run a home network with many connected devices.
- Set a secondary DNS server, not just a primary one, so failovers happen automatically.
Common Mistakes to Avoid
- Assuming DNS errors mean no internet at all. Often your connection is fine, and only lookups are failing.
- Skipping the basic restart. Many users jump straight to factory resets when a simple reboot would have worked.
- Forgetting to check for VPN interference. VPN-related DNS issues are frequently mistaken for Starlink problems.
- Mixing DHCP servers in bypass mode. Running two routers both trying to assign DNS addresses causes ongoing conflicts.
- Not checking for outages first. Spending an hour troubleshooting a problem that’s actually on Starlink’s end wastes time.
- Manually entering DNS addresses incorrectly. A single typo in an IP address will cause persistent failures.
Best Practices
- Set a static, reliable public DNS (like 1.1.1.1 or 8.8.8.8) on your router rather than relying solely on defaults, so individual devices don’t need manual configuration.
- Keep both your Starlink router firmware and your device operating systems updated.
- If running bypass mode, document your network topology so you can quickly identify where a DNS conflict might occur.
- Periodically flush your DNS cache on devices that are used heavily, such as work laptops.
- Monitor the Starlink app’s statistics page for obstruction or latency patterns that could point to recurring issues.
FAQ
It means your device connected to the Starlink network but couldn’t complete a DNS lookup, usually due to a router glitch, cache issue, or temporary outage.
No. A DNS error means your connection is active, but the system that translates website names into IP addresses is failing.
Starlink assigns DNS automatically through its router, though the specific servers can vary and aren’t always published, which is why many users switch to public alternatives like Google or Cloudflare.
No, and it may actually improve speed. Public DNS providers like Cloudflare are often faster than default ISP DNS servers.
Not directly, but weather-related signal obstructions can cause requests to time out in a way that looks like a DNS failure.
Check the Starlink app for outage alerts, and test whether other devices on your network are also affected.
Yes. VPNs route DNS requests through their own servers, and if that server is slow or down, you’ll see DNS errors unrelated to Starlink itself.
Bypass mode isn’t the cause of DNS issues by itself, but running two routers together without proper configuration can create conflicts.
There’s no strict requirement, but restarting monthly, or whenever you notice recurring connectivity issues, is a reasonable habit.
It resolves deep configuration problems, but if the issue was caused by a VPN, device, or third-party router, you’ll need to address that separately.
This points to a device-specific issue, such as a corrupted cache, outdated network drivers, or an incorrect manual DNS entry on that laptop.
It’s uncommon, but a heavily congested network can occasionally slow DNS resolution enough to trigger timeout errors.
Conclusion
A “DNS server not responding” message on Starlink is almost always fixable without professional help. In most cases, the issue comes down to a temporary glitch that clears with a simple router or device restart, a switch to a reliable public DNS server, or a quick network settings reset.
Work through the fixes in this guide starting with the simplest ones — restarting your router and device — before moving on to DNS changes, driver updates, or a full factory reset. If you’re running a bypass or bridge mode setup, pay close attention to how your routers are configured, since conflicting DHCP and DNS settings are a common culprit in more advanced setups.
With these steps, most Starlink users can restore a stable connection within minutes. If the problem persists after trying every fix here, it’s worth checking the Starlink app for outage alerts or reaching out to Starlink support directly, since a hardware issue could be at play.