Windows 10/11 “Can’t Connect to This Network” – 7 Working Fixes
Getting the “Can’t connect to this network” error on Windows 10/11? Here are 7 proven fixes to restore your Wi-Fi connection fast – no tech skills needed.
Quick Answer
The “Can’t connect to this network” error on Windows 10/11 is usually caused by outdated or corrupted Wi-Fi drivers, a mismatched network profile, or incorrect TCP/IP settings. The fastest fix is to forget the network and reconnect, or run the Windows Network Troubleshooter. Most users resolve it within 5 minutes.
Table of Contents
- What Is the “Can’t Connect to This Network” Error?
- Fix 1: Forget the Network and Reconnect
- Fix 2: Run the Network Troubleshooter
- Fix 3: Update or Reinstall Your Wi-Fi Driver
- Fix 4: Reset TCP/IP and Winsock
- Fix 5: Disable and Re-enable the Network Adapter
- Fix 6: Change Your Network Adapter’s Power Settings
- Fix 7: Change DNS to Google or Cloudflare
- Troubleshooting Table
- Pro Tips
- Common Mistakes to Avoid
- Best Practices
- FAQ
- Conclusion
What Is the “Can’t Connect to This Network” Error?
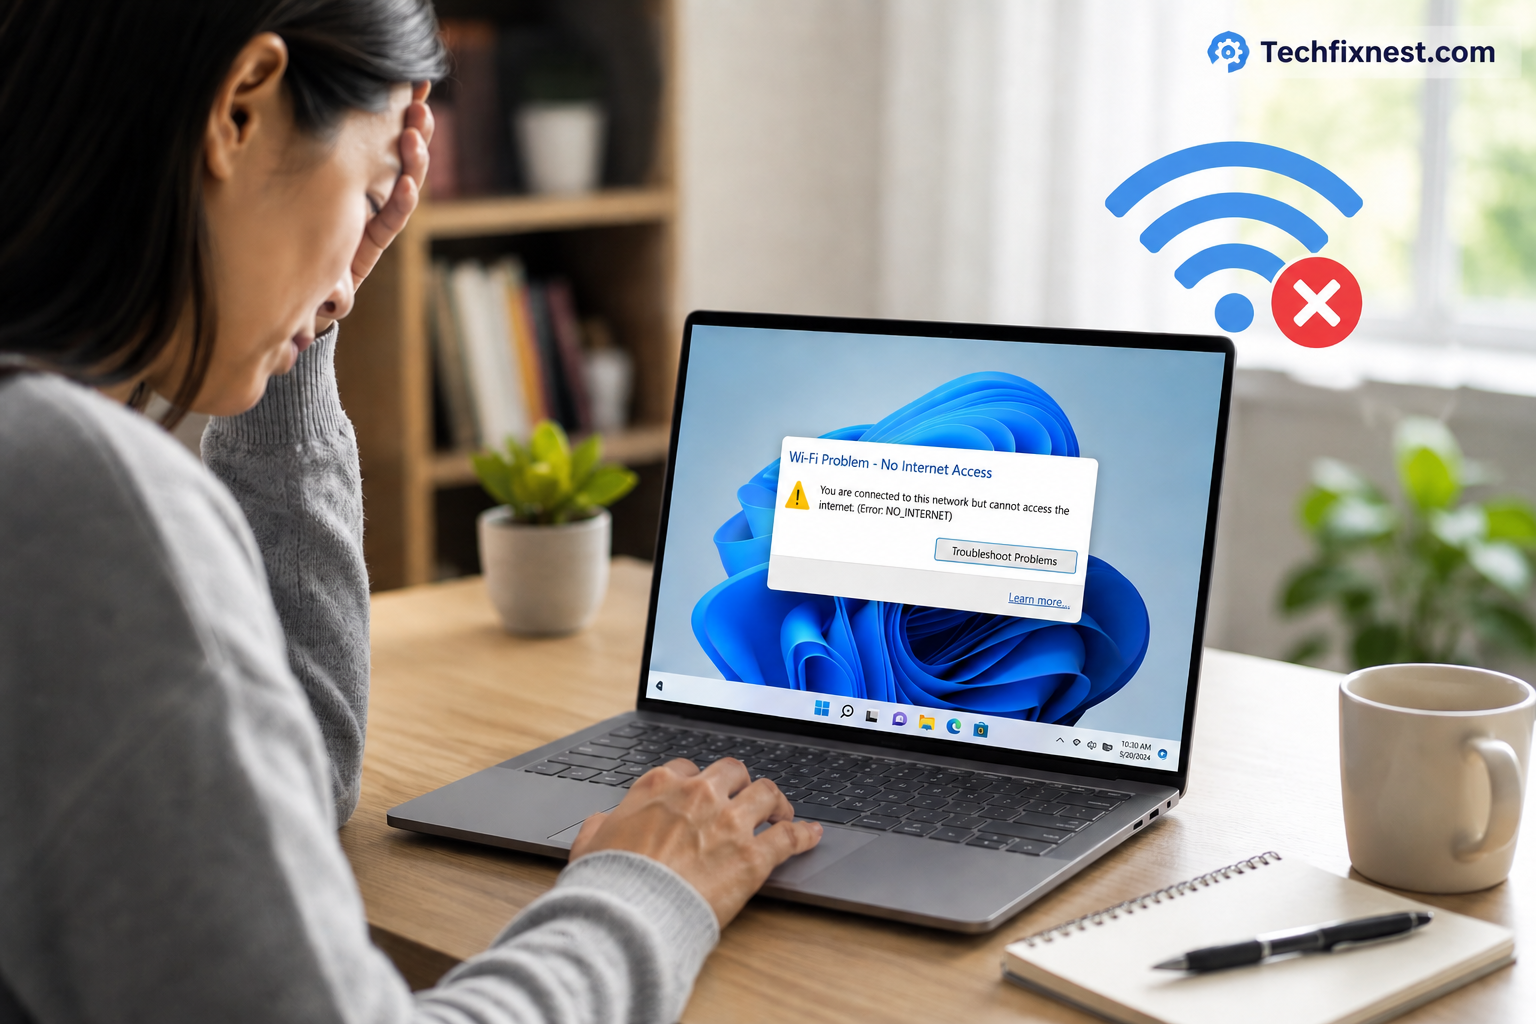
You click on your Wi-Fi network, enter the correct password, and Windows simply says: “Can’t connect to this network.”
No further explanation. No clue what went wrong.
This is one of the most frustrating Wi-Fi errors in Windows 10 and Windows 11. It can happen suddenly — even on a network you’ve connected to dozens of times before.
The error can appear for several reasons:
- A corrupted or outdated Wi-Fi driver
- A broken saved network profile stored by Windows
- Wrong TCP/IP or DNS settings
- A power management setting putting the adapter to sleep
- A Windows update that changed network configurations
This guide is for everyday Windows users — no technical background required. By the end, you’ll know exactly how to fix this error and keep it from coming back.
Let’s get your Wi-Fi working again.
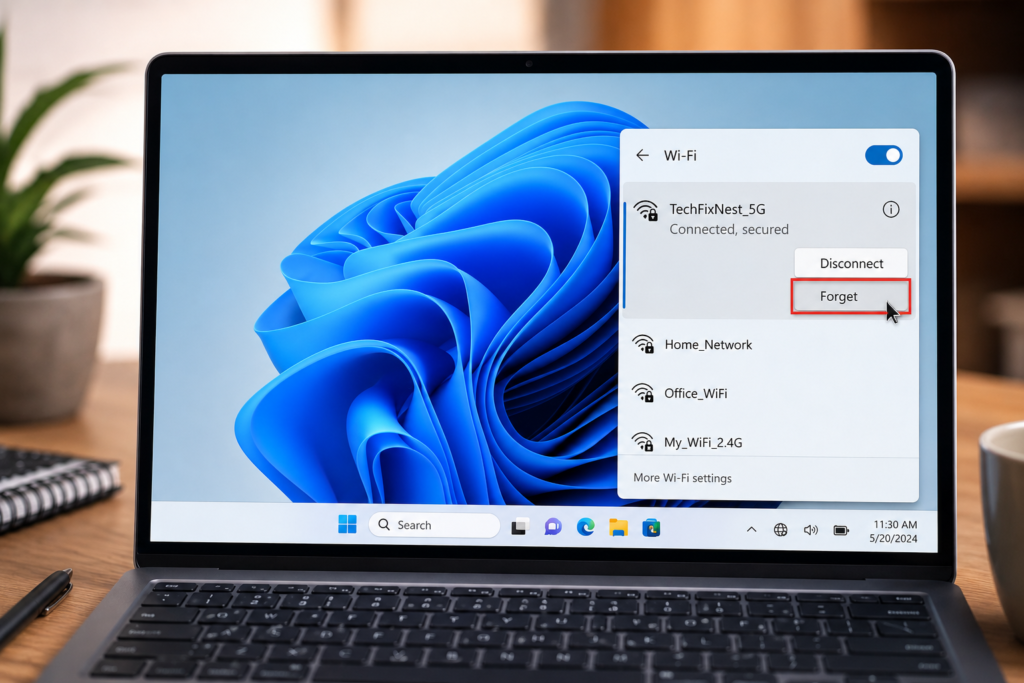
Fix 1: Forget the Network and Reconnect
This is the simplest fix — and it works surprisingly often.
Windows saves a “network profile” for every Wi-Fi network you’ve joined. If that profile gets corrupted (after a Windows update, for example), Windows will refuse to reconnect even with the right password.
Deleting the saved profile forces Windows to start fresh.
Steps:
- Click the Wi-Fi icon in the taskbar (bottom-right corner).
- Click the arrow (>) next to your Wi-Fi network name.
- Click Forget.
- Wait 10 seconds.
- Click on the network again and enter your Wi-Fi password.
If this doesn’t work, move to Fix 2.
Note: Make sure you have your Wi-Fi password ready before forgetting the network.
Fix 2: Run the Windows Network Troubleshooter
Windows has a built-in troubleshooter that can automatically detect and fix common network problems.
It’s not perfect, but it often catches simple issues like misconfigured adapters or DNS problems.
Steps for Windows 11:
- Press Windows + I to open Settings.
- Go to System > Troubleshoot > Other troubleshooters.
- Click Run next to Internet Connections.
- Follow the on-screen instructions.
Steps for Windows 10:
- Press Windows + I to open Settings.
- Go to Update & Security > Troubleshoot > Additional troubleshooters.
- Click Internet Connections > Run the troubleshooter.
Let Windows complete the scan. If it finds an issue, apply the suggested fix and restart your computer.
Fix 3: Update or Reinstall Your Wi-Fi Driver
A corrupted, outdated, or incompatible Wi-Fi driver is one of the most common causes of the “Can’t connect to this network” error — especially after a Windows update.
Updating or reinstalling the driver usually solves the problem.
Option A: Update the Driver
- Press Windows + X and click Device Manager.
- Expand Network Adapters.
- Right-click your Wi-Fi adapter (usually named “Intel Wireless” or similar).
- Click Update driver.
- Select Search automatically for drivers.
- Restart your PC after the update.
Option B: Reinstall the Driver
If updating doesn’t help, try a clean reinstall:
- In Device Manager, right-click your Wi-Fi adapter.
- Click Uninstall device.
- Check the box that says “Delete the driver software for this device” (if available).
- Click Uninstall.
- Restart your PC — Windows will automatically reinstall the driver.
Option C: Download the Driver Manually
If auto-update fails, visit your laptop/PC manufacturer’s website (Dell, HP, Lenovo, ASUS, etc.) and download the latest Wi-Fi driver for your specific model.
Warning: Always download drivers from the official manufacturer website. Third-party driver tools can install malware.
Fix 4: Reset TCP/IP and Winsock
Your Windows network stack (the set of protocols that manage internet connections) can get corrupted. Resetting it clears bad configurations and forces Windows to rebuild the stack from scratch.
This fix is especially helpful if the error appeared after a Windows update or a failed network change.
Steps:
- Press Windows + S, type cmd, and click Run as administrator.
- Type each command below, pressing Enter after each:
netsh winsock reset
netsh int ip reset
ipconfig /release
ipconfig /flushdns
ipconfig /renew- Restart your computer after running all commands.
Tip: Don’t skip the restart — the changes only take effect after rebooting.
Fix 5: Disable and Re-enable the Network Adapter
Sometimes the Wi-Fi adapter gets stuck in an error state. Disabling and re-enabling it acts like a quick reset.
Steps:
- Press Windows + X and click Network Connections (or Device Manager).
- In Device Manager, expand Network Adapters.
- Right-click your Wi-Fi adapter.
- Click Disable device.
- Wait 10 seconds.
- Right-click it again and click Enable device.
- Try connecting to Wi-Fi again.
Alternatively, you can do this from the Network & Internet Settings:
- Go to Settings > Network & Internet > Advanced network settings.
- Click on your Wi-Fi adapter.
- Click Disable, wait, then click Enable.
Fix 6: Change Your Network Adapter’s Power Settings
Windows sometimes puts your Wi-Fi adapter into a low-power sleep mode to save battery. When this happens, the adapter can fail to reconnect properly — causing the “Can’t connect to this network” error.
Disabling this setting keeps your adapter always active.
Steps:
- Press Windows + X and click Device Manager.
- Expand Network Adapters.
- Right-click your Wi-Fi adapter and click Properties.
- Click the Power Management tab.
- Uncheck the box that says: “Allow the computer to turn off this device to save power.”
- Click OK.
- Restart your PC and try reconnecting.
Fix 7: Change DNS to Google or Cloudflare
Sometimes the issue isn’t your Wi-Fi connection at all — it’s your DNS settings. If your router’s default DNS is slow or misconfigured, Windows may fail to establish the connection properly.
Switching to a reliable public DNS like Google (8.8.8.8) or Cloudflare (1.1.1.1) can fix this.
Steps:
- Press Windows + R, type
ncpa.cpl, and press Enter. - Right-click your Wi-Fi adapter and click Properties.
- Double-click Internet Protocol Version 4 (TCP/IPv4).
- Select Use the following DNS server addresses.
- Enter:
- Preferred DNS:
8.8.8.8(Google) or1.1.1.1(Cloudflare) - Alternate DNS:
8.8.4.4(Google) or1.0.0.1(Cloudflare)
- Preferred DNS:
- Click OK and close all windows.
- Reconnect to your Wi-Fi network.
Troubleshooting Table
| Problem | Possible Cause | Solution |
|---|---|---|
| Error on a specific network only | Corrupted saved network profile | Forget and reconnect (Fix 1) |
| Error after Windows Update | Driver incompatibility | Update or reinstall Wi-Fi driver (Fix 3) |
| Error on all networks | Corrupted TCP/IP stack | Reset Winsock and TCP/IP (Fix 4) |
| Wi-Fi disconnects frequently | Power management settings | Disable “Allow PC to turn off device” (Fix 6) |
| Connected but no internet | DNS misconfiguration | Switch to Google/Cloudflare DNS (Fix 7) |
| Adapter not visible in Device Manager | Driver completely missing | Download driver from manufacturer’s site |
| Troubleshooter finds no problems | Deeper driver or firmware issue | Reinstall Wi-Fi driver (Fix 3, Option B) |
| Error returns after reboot | Corrupted network profile | Forget network + reset Winsock (Fix 1 + Fix 4) |
Pro Tips
- Try airplane mode first. Toggle Airplane Mode on and off from the taskbar. This soft-resets your wireless radio in seconds.
- Restart your router too. Unplug it for 30 seconds, then plug it back in. Many “Windows errors” are actually router issues.
- Check the date and time. Incorrect system time can prevent Windows from authenticating to a network. Make sure your PC clock is accurate.
- Use an Ethernet cable to test. If wired internet works fine, the issue is definitely with your Wi-Fi adapter or driver — not your internet connection.
- Check for Windows Updates. Sometimes a specific update breaks Wi-Fi. Check if a newer update is available that patches the issue.
- Try a different Wi-Fi band. If your router broadcasts both 2.4 GHz and 5 GHz networks, try connecting to the other one.
- Disable VPN or antivirus temporarily. Some VPN and security tools interfere with network connections. Disable them briefly to test.
- Run SFC scan. Open Command Prompt as administrator and run
sfc /scannowto check for and repair corrupted Windows system files. - Check for IP address conflicts. If another device on your network is using the same IP as your PC, it can cause connection errors. Setting your IP to automatic (DHCP) usually fixes this.
- Create a new network profile via Command Prompt. Advanced users can export/import Wi-Fi profiles using
netsh wlan export profileandnetsh wlan add profile.
Common Mistakes to Avoid
- Entering the wrong Wi-Fi password. Double-check your password — especially for networks with special characters.
- Not restarting after driver changes. Driver updates and Winsock resets require a full restart to take effect. Don’t skip this step.
- Forgetting to “Forget” the network before reconnecting. Simply clicking “Connect” again uses the old, possibly corrupted profile.
- Downloading drivers from unofficial sources. Third-party sites may bundle outdated or malicious drivers. Always use the manufacturer’s official website.
- Running the troubleshooter and ignoring the result. The troubleshooter sometimes identifies the issue but doesn’t apply the fix automatically — read its suggestions carefully.
- Only restarting the PC — not the router. Your router needs a restart too, especially if the issue affects multiple devices.
- Skipping the power management fix on laptops. This setting is a very common cause on laptops and is often overlooked.
Best Practices
Follow these habits to prevent the “Can’t connect to this network” error from coming back:
- Keep drivers updated. Check for Wi-Fi driver updates every few months, especially after major Windows updates.
- Update Windows regularly. Microsoft releases patches that fix network bugs. Don’t delay updates for too long.
- Use a stable DNS provider. Stick with a reliable DNS like Google or Cloudflare instead of relying on your ISP’s default DNS.
- Don’t let too many saved networks accumulate. Periodically clean up old, unused Wi-Fi profiles from your device.
- Restart your router monthly. A simple monthly reboot keeps your router firmware fresh and connections stable.
- Use a quality router. Consumer-grade routers degrade over time. If you’re on a 5+ year-old router, upgrading it can eliminate many connection issues.
- Avoid Windows Insider builds for daily use. Beta builds of Windows can introduce unstable network drivers. Stick to stable releases unless you’re testing.
FAQ
This error usually means Windows has a corrupted saved network profile, an outdated Wi-Fi driver, or a misconfigured TCP/IP stack. It can also happen after a Windows Update that changed driver compatibility.
Start by forgetting the network and reconnecting. If that doesn’t work, update your Wi-Fi driver in Device Manager, then reset TCP/IP using Command Prompt commands like netsh winsock reset and ipconfig /flushdns.
Windows Updates sometimes install generic drivers that overwrite your manufacturer’s optimized Wi-Fi driver. Reinstalling the correct driver from your PC manufacturer’s website usually resolves this.
Yes. If your router firmware is outdated, it’s broadcasting on an incompatible channel, or its DHCP settings have changed, Windows may display this error. Restarting or factory-resetting your router can help.
Not usually. If the password is wrong, Windows shows a different error (“Network security key mismatch”). The “Can’t connect to this network” error is almost always a software or driver issue.
Go to Settings > Network & Internet > Advanced network settings, select your Wi-Fi adapter, and click Disable, then Enable. You can also do this in Device Manager.
Yes, but it’s a last resort. You should try all the fixes in this guide before reinstalling Windows. A fresh Windows install will fix driver and configuration issues but takes much more time.
Sometimes. Security tools and VPN software can interfere with network adapter settings. Try disabling them temporarily to see if they’re causing the issue.
If the error is limited to one network, the problem is almost certainly a corrupted saved profile for that network. Use Fix 1 (Forget and Reconnect) to clear it.
Not necessarily. If other devices connect to the same network fine, your adapter is probably working — the issue is with Windows configuration. If no fix works and the adapter doesn’t appear in Device Manager, it may be a hardware issue.
Open Device Manager, expand Network Adapters, right-click your Wi-Fi adapter, click Properties, and go to the Driver tab. You’ll see the driver version and date.
Sometimes. If your ISP’s DNS is misconfigured or your router is assigning a faulty DNS server, changing to Google (8.8.8.8) or Cloudflare (1.1.1.1) can help establish the connection.
Conclusion
The “Can’t connect to this network” error on Windows 10 and 11 is annoying, but it’s almost always fixable without calling a technician.
Start with the simplest solution — forget the network and reconnect (Fix 1). If that doesn’t work, run the Network Troubleshooter and then try updating your Wi-Fi driver. For persistent issues, the TCP/IP reset (Fix 4) is one of the most effective solutions available.
Here’s your quick action plan:
- Forget the network → reconnect
- Run the troubleshooter
- Update or reinstall the Wi-Fi driver
- Reset TCP/IP and Winsock
- Disable and re-enable the network adapter
- Change power management settings
- Switch to Google or Cloudflare DNS
Work through the fixes in order and you’ll be back online fast. If none of these work, it may be time to contact your PC manufacturer or check whether your Wi-Fi adapter needs replacement.